|
 Kynex is pleased to
introduce our new Trade Entry Execution mechanism. It is an improvement from our original
mechanism and has several advantages: Kynex is pleased to
introduce our new Trade Entry Execution mechanism. It is an improvement from our original
mechanism and has several advantages:
•
Trades can now be allocated across multiple prime brokers in a single execution.
•
Improved logic does a more accurate job of
maintaining Distribution and Hedge across accounts and prime brokers.
•
Easily manage your
hedge by seeing exactly what your post-trade deltas will be.
•
Post-trade inventory can be targeted to the nearest 1, 10, or 100 of your choice.
Quick Links
Allocation
Concepts
Mechanics
Modifying
Allocations
Benefits
of the New Execution Mechanism
Modifying
an Existing Execution
Frequently
Asked Questions
Allocation Concepts
We would like to
introduce three allocation concepts for entering executions. They are Pre-set Allocation, Maintain
Distribution and Maintain Hedge.
Maintain Distribution is a new allocation concept that has many advantages. Maintain Distribution is the starting
point of the allocation. You can
change the allocation by clicking the different allocation buttons in the
Main section of the page.
• Maintain
Distribution is the starting point for the Execution ticket. It
attempts to maintain post-trade inventory to the targets specified on your
Trade Entry à
Accounts page. Maintain Distribution
will look at your current inventory and then attempt to allocate the
current trades such that your ending inventory will match your specified
targets. Taking the allocation on
the primary side (derivative) into account, it then allocates the swap
quantity such that the post-trade deltas are balanced across accounts and
prime brokers.
For example, suppose the targets on your Accounts page
are 80% for Account 1 and 20% for Account 2. Your current holdings on a
particular security are 800 bonds vs. 20,000 short in Account 1, and 200
bonds vs. 5,000 short in Account 2.
Now assume that there has been some capital inflow into
Account 2, making its NAV equal to that
of Account 1. Your targets have changed to 50% for Account 1 and 50% for
Account 2, and you have updated the Trade Entry à
Accounts page to reflect this new ratio.
On your next trade, the Execution mechanism will
allocate the total quantity across accounts such that the 50/50 account
ratio will be preserved.
Additionally, the Maintain Hedge feature (described later in this
section) will intelligently distribute this trade’s stock shares to
equalize your deltas (as closely as possible) across each account.
• Pre-Set Allocation breaks down your current trade and
allocates it to different accounts based upon your pre-set targets. If you have set up your target as 30%
(Account 1), 40% (Account 2), 30% (Account 3) and you book a trade, Buy
Long 1000 Convertible bonds and Sell Short 500 shares, then the Pre-Set
Allocation will allocate 300 convertibles and short (150) stock in Account
1, 400 bond and short (200) shares in Account 2, and 300 bonds and short
(150) shares in Account 3. Pre-Set
Allocation ignores pre-trade inventory when allocating new trades.
• Maintain Hedge attempts to allocate your swap quantity
to balance your post-order delta across accounts and prime brokers. You can arbitrarily overwrite the primary
side of the trade and use the Maintain Hedge to balance the deltas across
Accounts and Primes.
Advantages of Using Maintain Distribution
When you have
multiple accounts with capital in-flows and out-flows
from existing accounts at different rates as well as capital in-flows into
new accounts, your inventory will get out-of-balance with respect to the NAV of accounts very quickly. Often it may
not be economical to trade in specific accounts in response to capital
flows. It is better to keep the inventory at the risk of a slight change in
leverage and trade opportunistically and allocate the trades such that your
inventory approaches the desired targets. Our Maintain Distribution is the
most efficient way to accomplish this. The Pre-Set Allocation, which is the
most prevalent on the Street, will never reach the desired targets without
manual overrides.
Top
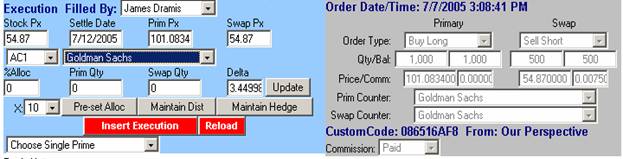
Mechanics
The new Trade
Entry Execution interface is presented in this section. The Main section
(top half, see Figure 1) allows you to specify execution prices and
allocations.
Figure 1:
Main Section
The Allocation section (bottom half, see Figure 2) of the Execution
interface presents Pre-Trade, This Trade, and Post-Trade quantities, as
well as deltas. On the far right
side of the interface are displayed three important fields: (1) Post-Alloc Pct, (2) Target Alloc
Pct, and (3) Post-Alloc Delta. These fields will now be discussed.
1 2 3
  Figure 2:
Allocation Section Figure 2:
Allocation Section
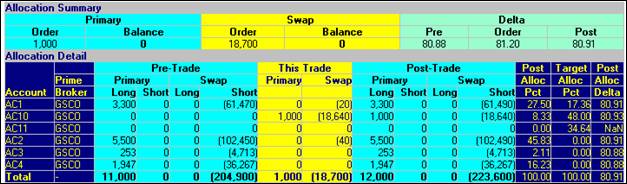
1. Post-Allocation Percent
This column
displays your post-trade inventory allocation after the execution is
completed.
2. Target Account Percentage
To set your
Target Account Percentage, go to the main Trade Entry page and click on
“Accounts.” Then, in each of the
account boxes, enter the percentage of the desired allocation. When you place future trades, the Kynex
Execution mechanism will choose the optimal allocation based on these
target percentages. These
percentages will be implemented only for your default prime broker. If you would like different account
percentages for different prime brokers, please give us a call so that we
can make the necessary configuration changes.
3. Post-Allocation Delta
After the
primary side has been allocated the new Trade Entry mechanism will allocate
the swap quantity to match the Post-Alloc
Delta. This will allow you to
maintain your hedge equally across the accounts and different prime
brokers.
EXAMPLE: To illustrate how Post-Allocation Delta works,
let us assume your current inventory is 1,000 on the primary versus 20,000
on the swap, representing a delta of 60.
If you are buying 2000 bonds vs. 30,000 shares short, your
post-trade delta would be 50. If your pre-trade inventory of 1,000 vs. 20,000
was not balanced across accounts, our Maintain Hedge mechanism will
allocate the swap quantity such that the delta in all accounts approach the
post-trade delta, which is 50 in this example.
Top
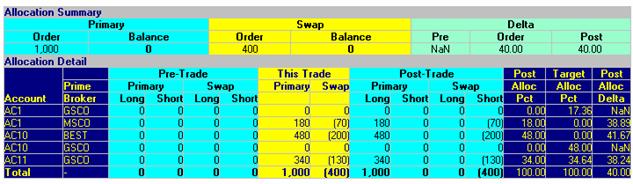
Modifying Allocations
Using the Main
section of the interface (Figure 3), Account and Prime Broker allocations
can be added or deleted, with the change being reflected in the Allocation
section (Figure 4). The screen-shots below illustrate the basics of
inserting new Account and Prime Broker allocations, and for modifying
existing allocations.

Figure 3:
Modifying Allocations
    
|
|
|
|
|
|
Set all account allocations to a single Prime
using this control.
|
|
|
|
Each line displays part of the total allocation
for this trade.
|
|
  Figure 4: Allocation Results Figure 4: Allocation Results

Current Holdings for each Account & Prime
|
|
  
Allocation
for this trade
|
|
Holdings AFTER this
trade
|
|


Top
Benefits of the New Execution Mechanism
If you have only
one Account, the basic functionality of this interface is similar to the
previous version. However, the real advantages of the new system are fully
realized if you deal with multiple Accounts and Prime Brokers.
Clients with a Single Account and Single
Prime Broker
Only the
Execution mechanism’s general layout is changed. All trades will be allocated to your
single Account and Prime Broker.
Clients with a Single Account and
Multiple Prime Brokers
The new
Execution mechanism will now allow you to book a trade and allocate it
across multiple Prime Brokers in one execution. Previously, you would have to enter a
separate execution for each Prime Broker.
If you want a Prime Broker target percentage to be set up, please
give us a call. The default
allocation is Maintain Distribution.
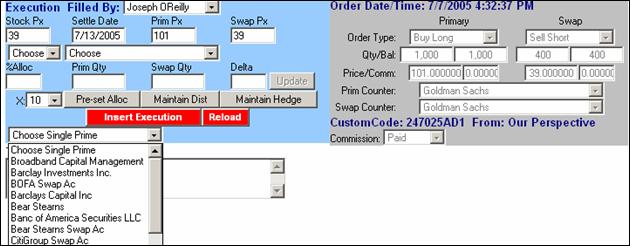
Allocating
trades to a single Prime Broker is simple. Suppose you place a trade which
is initially allocated to both Goldman Sachs and Morgan Stanley. If you wanted to switch the Prime Broker
from Goldman Sachs and Morgan Stanley to Merrill Lynch, simply open the
“Choose Single Prime” drop-down menu in the Main section (Figure 5), then click on
Merrill Lynch. All allocations for this trade will automatically be set to
Merrill Lynch, and this change will be reflected in the Prime Broker column
of the Allocation section.
Figure 5: Allocating Entire Trade to a Single Prime
Broker

Clients with Multiple Accounts and
Multiple Prime Brokers
The new
Execution mechanism eliminates the need for multiple executions in the
event that one trade needs to be allocated across several Prime Brokers.
Allocations for both multiple Prime Brokers and multiple Accounts can now be done with a single trade.
Top
Modifying an Existing
Execution
The new Modify Execution feature is
accessed by clicking on the appropriate line in the Today’s Executions,
Recent Executions, or Trade History View pages, and selecting Modify
Execution from the menu.
The Modify Execution interface is similar
in appearance to the Execution interface that was described earlier in this
tutorial. The main difference is
that an Item to Modify field and
a Modification Details box
appear in the Main section (Figure 6).
Figure 6:
Modify Execution (Main Section)
  

  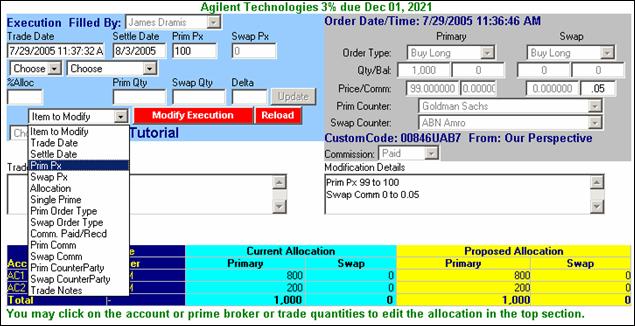
To modify an
execution, simply use the Item to
Modify control to select the trade attribute that requires a change.
The appropriate field (Prim Price in the Figure 6 example above) will then
be activated, allowing you to enter the change. Once the change has been
made, click your mouse outside of the field to commit the change. The
modification will then be displayed in the Modification Details box.
In the example above, the Prim Price was changed from 99 to 100, and
the Swap Commission was changed from 0 to 0.05.
It may frequently
be necessary to modify an execution’s quantity for a particular Account and
Prime. To do this, find the line in the Allocation section (Figure 7) that
requires modification, and click on either the Account, Prime Broker, or
the Proposed Allocation Quantity (yellow field). Then, go to the Main
section to edit the quantity, and click the Update button to commit the
change.
To move
allocations to other Accounts and Prime Brokers, please refer to the
complete explanation here.
ain
Section)Execution feature,. in betweeco for the past few days. It is'

Figure 7:
Modify Execution (Allocation Section)
Top
Frequently Asked Questions
• This looks too complicated! Where do I begin?
Although there
is a slightly greater learning curve to the new system, you will find that
it is much more powerful than the previous version. Take a few minutes to experiment with
adding and deleting Account and Prime Broker allocations, and get a feel
for how the page works. After making
a change, be sure to click the Update button to commit the change, and then
verify that the new allocation is correct by looking at the Allocation
section.
It is important
to keep in mind that the actual trade allocation will be entered EXACTLY as
it appears in the Allocation section, so always verify that your Accounts, Prime Brokers, and Quantities are correct
before inserting the execution.
With a little
bit of practice, we’re confident that you will appreciate this system’s
greatly-improved functionality.
• I have several accounts, and this page
defaulted all of them to the wrong Prime Broker. Is there an easy way to fix this?
Yes. Simply click on the Choose Single Prime
on the top section of the screen, and select your new Prime Broker. All
Account allocations will then be switched to the new Prime Broker.
• The
default allocations are not going to the Accounts and Primes that I
want. How can I fix this?
Start by
zeroing-out any Account/Prime combinations that you don’t need. To do this, look at the Allocation
section and click on the Account, Prime, or “This Trade” Quantity to select
the appropriate Account/Prime combination in the Main section of the
interface. Then set quantities to
zero, and click Update. Repeat for
all Account/Prime combinations that you need to delete.
Next, find any
Account/Prime combinations that you need which are
already existing in the Allocation section. If you need to modify
the quantity of a particular allocation, click on the quantity in the “This
Trade” column to select the appropriate combination in the Main
section. Edit the Quantity fields in
the Main section as needed, then click the Update
button to commit the changes. Repeat
this process for all Account/Prime combinations that require modification
of the quantity.
Finally, you
must add any Accounts and Primes that require allocation, but do not yet
exist as a line item in the Allocation section. First, select an Account in
the drop-down menu in the Main section, then select a Prime Broker. Type in
the Primary and Swap Quantities, and click Update. The new row will appear
in the Allocation section of the interface. Repeat this step for each
Account/Prime combination that you need to add.
Top
|
